안녕하신가요 Skillist입니다~
오늘은 어떤 section을 구현해볼까요?
expandable celle을 구현해볼게요!!

"더보기" 버튼을 터치하면 확장돼요!!!!
어때요??????? 쉬워보이는데, 저는 구현하느라 엄청 힘들었었어요 ㅠㅜㅜㅠㅜㅠ
열심히 구글링 했었어요 ㅜㅠㅜㅜㅠ
참고로, appStore를 보면 "더보기" 버튼의 백그라운드에 그라데이션을 추가하여, 자연스럽게 구현돼있던데,
저는 따로 구현하지 않았습니다. 궁금하시면 앱스토어 실행해서 여러 앱 보면서 분석해보세요.
나중에 시간되면 해볼게요!
Android, iOS의 여러 앱들을 분석하고 클론코딩도 해봤지만, 꼼꼼하게 살펴보면 보이더라구요.
------------------------------------------------------------------------------------------------------------------
어김없이 section부터 구현해봅니다.!

289라인 : item을 구현합니다.
294라인 : group를 구현합니다
299라인 : section을 구현합니다.
304라인 : header를 구현합니다.
section 구현은 너무 자주 봐서 지겹죠??????? 너도 살짝 지겨워졌어요 ㅋㅋㅋㅋ ㅠㅜ 좋은겁니다!!! 익숙해졌다는 말이에요!
------------------------------------------------------------------------------------------------------------------
cell 구현에 앞서, Delegate를 구현합니다!
어떤 delegate냐면, cell expand 후에 레이아웃을 업데이트하기 위함입니다.

delegate의 함수는 2개입니다.
collectionViewLayoutUpdate()는 레이아웃 업데이트를,
expandCell(indexPath:)는 expand 여부를 저장합니다.
DetailViewController에서 채택 후 상세구현을 진행했습니다.
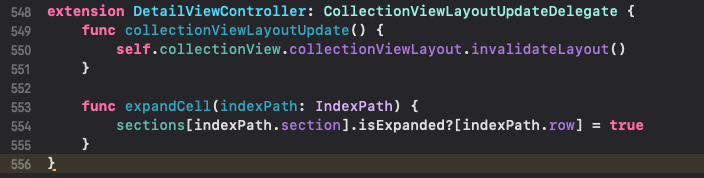
invalidateLayout()은 현재 레이아웃 업데이트하도록 합니다.

cell expand시 해당 함수를 호출해줘 레이아웃을 업데이트 해줍니다!!!
------------------------------------------------------------------------------------------------------------------
다음은 Cell을 구현해볼게요
구성을 보니, label과 button만 있으면 되겠네요???? 무야호~~~~~~~!!!!!!
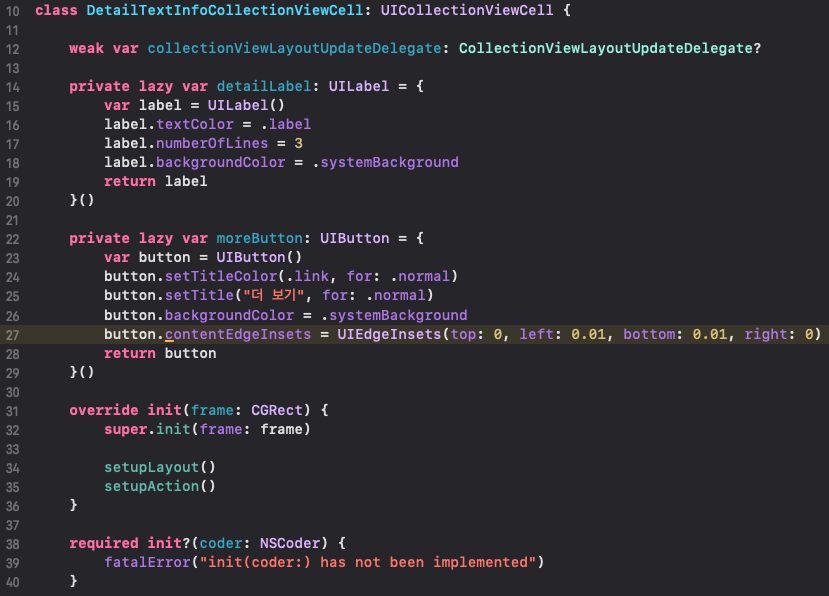
14라인 : 라벨입니다. 우선적으로 최대 3라인까지 보여줄수 있도록 구현설정해줬어요.
22라인 : 버튼 입니다! contentEdgeInsets을 활용했는데, iOS15에서 deprecated됐다고 경고가 발생하네요.

31라인 : 이니셜라이저입니다. 레이아웃과 버튼에 대한 동작을 구현했어요.

42라인 : 라벨과 버튼을 추가하고 제약사항을 구성했어요.
62라인 : 버튼 터치에 대한 동작을 추가했어요. 66라인을 보면 됩니다.
66라인 : 멀티라인을 0으로 지정하여, 모든 라인을 보여줄수 있도록 해줬고, 버튼을 숨겨줬습니다. 그리고 가장 중요한것!
delegate의 collectionViewLayoutUpdate()를 호출했어요. 레이아웃을 업데이트 해주는 함수였죠?
73라인 : label을 세팅했습니다.
------------------------------------------------------------------------------------------------------------------
이렇게 expandable cell을 구현해봤습니다.
구현할땐 시간도 잡아먹었고, 어떻게 구현해야 할지 감이 안왔었는데,
열심히 구글링 해보니, 답이 있긴 있더라구요. 포기만 하지 않는다면 해답은 있습니다!

잘못되거나 부족한 내용 등, 피드백 감사합니다!
Skillist의 AppleAppStore 프로젝트
https://github.com/DeveloperSkillist/AppleAppStoreCloneCode
GitHub - DeveloperSkillist/AppleAppStoreCloneCode: AppleAppStoreCloneCode
AppleAppStoreCloneCode. Contribute to DeveloperSkillist/AppleAppStoreCloneCode development by creating an account on GitHub.
github.com
↓↓↓↓↓↓↓↓↓↓↓↓↓↓↓↓↓↓↓↓↓↓↓↓↓↓↓↓↓↓↓ 전체 코드 ↓↓↓↓↓↓↓↓↓↓↓↓↓↓↓↓↓↓↓↓↓↓↓↓↓↓↓↓↓↓↓
    private func createTextInfoWithHeaderSection() -> NSCollectionLayoutSection {
        let itemMargin: CGFloat = 5
        let sectionMargin: CGFloat = 15

        //item
        let itemSize = NSCollectionLayoutSize(widthDimension: .fractionalWidth(1), heightDimension: .estimated(1))
        let item = NSCollectionLayoutItem(layoutSize: itemSize)
        item.contentInsets = .init(top: itemMargin, leading: itemMargin, bottom: itemMargin, trailing: itemMargin)

        //group
        let groupSize = NSCollectionLayoutSize(widthDimension: .absolute(collectionView.frame.width - sectionMargin), heightDimension: .estimated(1))
        let group = NSCollectionLayoutGroup.horizontal(layoutSize: groupSize, subitems: [item])
//        group.contentInsets = .init(top: 0, leading: 0, bottom: 0, trailing: 0)

        //section
        let section = NSCollectionLayoutSection(group: group)
        section.orthogonalScrollingBehavior = .none
        section.contentInsets = .init(top: sectionMargin, leading: sectionMargin, bottom: sectionMargin, trailing: sectionMargin)

        //header
        let sectionHeader = createHeader()
        section.boundarySupplementaryItems = [sectionHeader]

        return section
    }
protocol CollectionViewLayoutUpdateDelegate: AnyObject {
func collectionViewLayoutUpdate()
func expandCell(indexPath: IndexPath)
}extension DetailViewController: CollectionViewLayoutUpdateDelegate {
func collectionViewLayoutUpdate() {
self.collectionView.collectionViewLayout.invalidateLayout()
}
func expandCell(indexPath: IndexPath) {
sections[indexPath.section].isExpanded?[indexPath.row] = true
}
}class DetailTextInfoCollectionViewCell: UICollectionViewCell {
weak var collectionViewLayoutUpdateDelegate: CollectionViewLayoutUpdateDelegate?
private lazy var detailLabel: UILabel = {
var label = UILabel()
label.textColor = .label
label.numberOfLines = 3
label.backgroundColor = .systemBackground
return label
}()
private lazy var moreButton: UIButton = {
var button = UIButton()
button.setTitleColor(.link, for: .normal)
button.setTitle("더 보기", for: .normal)
button.backgroundColor = .systemBackground
button.contentEdgeInsets = UIEdgeInsets(top: 0, left: 0.01, bottom: 0.01, right: 0)
return button
}()
override init(frame: CGRect) {
super.init(frame: frame)
setupLayout()
setupAction()
}
required init?(coder: NSCoder) {
fatalError("init(coder:) has not been implemented")
}
private func setupLayout() {
[
detailLabel,
moreButton
].forEach {
addSubview($0)
}
detailLabel.snp.makeConstraints {
$0.top.leading.trailing.equalToSuperview()
$0.bottom.equalToSuperview()
}
moreButton.snp.makeConstraints {
$0.trailing.bottom.equalTo(detailLabel)
}
sizeToFit()
}
private func setupAction() {
moreButton.addTarget(self, action: #selector(showAllDetailInfo), for: .touchUpInside)
}
@objc private func showAllDetailInfo() {
detailLabel.numberOfLines = 0
moreButton.isHidden = true
collectionViewLayoutUpdateDelegate?.collectionViewLayoutUpdate()
}
func setupItem(text: String) {
detailLabel.text = text
}
}'iOS 개발 > Apple App Store 클론 코딩' 카테고리의 다른 글
| AppleAppStore - 17. DetailViewController의 section, cell 구현 6 (0) | 2022.01.05 |
|---|---|
| AppleAppStore - 16. DetailViewController의 section, cell 구현 5 (0) | 2022.01.04 |
| AppleAppStore - 14. DetailViewController의 section, cell 구현 3 (0) | 2022.01.04 |
| AppleAppStore - 13. DetailViewController의 section, cell 구현 2 (0) | 2022.01.04 |
| AppleAppStore - 12. DetailViewController의 section, cell 구현 1 (0) | 2022.01.03 |


